MakeUseOf.com: “Cool Websites and Tools [December 28th]” plus 11 more | |

- Cool Websites and Tools [December 28th]
- The 10+ Toughest Tech Questions [MakeUseOf Answers]
- HeyTell – Give Your iPhone, iPad Or Android Phone Push-To-Talk Functionality
- Three Reasons You Should Consider Buying A Mechanical Keyboard
- How To Make Your Own Smartboard With A Wii Remote
- Hot Tech Deals [Dec 28th]
- 7 Citizen Journalism Websites For Crowdsourced News
- How To Use Mind-Mapping Software To Organize Your New Year Resolutions
- How To Create & Use A USB Ubuntu Linux Boot Jump Drive
- How To Fix An Overheating Laptop
- Contigo Autoseal Spill-Proof Travel Mug Review and Giveaway
- How To Clean Up Your Computer Back To Its Original State (Without Reinstalling Windows)
| Cool Websites and Tools [December 28th] Posted: 28 Dec 2010 07:31 PM PST
These are just half of the websites that we discovered in the last couple of days. If you want us to send you daily round-ups of all cool websites we come across, leave your email here. Or follow us via RSS feed. Got Questions? Ask Them Now FREE on MakeUseOf Answers!
    
Similar MakeUseOf Articles
| ||||||||||||||||||||||||
| The 10+ Toughest Tech Questions [MakeUseOf Answers] Posted: 28 Dec 2010 05:31 PM PST
With the holidays around it may have taken a little longer to get questions published and answered. It’s good to see that people are busy spending time away from the computer during the holidays. This is why there are many Unanswered Questions waiting for help these days. If you have a minute or two, please share your expertise. As always, you will automatically enter our weekly Best Answer of the Week contest with every answer provided. Click to read more…
MakeUseOf Answers never tires. We make an effort to answer every question. Join us and browse our Latest Questions, Most Popular Questions, or Unanswered Questions. For regular updates subscribe to the Answers RSS Feed. Need help? Ask A Question at MakeUseOf Answers. Hey Facebookers, make sure to check out MakeUseOf page on Facebook. Over 24,000 fans already!

Similar MakeUseOf Articles
| ||||||||||||||||||||||||
| HeyTell – Give Your iPhone, iPad Or Android Phone Push-To-Talk Functionality Posted: 28 Dec 2010 03:31 PM PST
This month I’m giving your phone free push-to-talk phone service with HeyTell. Push-to-talk, or PTT, is a way of communicating via a 2-way radio of sorts, and it provides a form of instant communication between yourself and the person you’re calling. In this article, I’ll explain the concept of PPT further, as well as show you what you can do with HeyTell. What Is HeyTell?
HeyTell takes the dialing out of making a phone call. It’s an app that let’s you send and receive voice messages with other HeyTell users by pressing a single button on your phone. They have a great video demonstration on their website, as well as this statement describing HeyTell:
Voice messages are said to be quicker than SMS and have very low data usage (no more than sending an email). As stated, the app is free to use and you can use it on 3G, EDGE, and WiFi connections. More HeyTell Features
HeyTell is very easy to use. You just fire up the app, select the person you want to leave a message for from your contacts, and press the Hold and Speak button to begin recording your message. While you’re doing this, you’ll be able to see the person’s location using the GPS function.
Messages can be listened to from your inbox at any time. Push notifications are enabled to alert you whenever a voice message is received. If you ever get an “Inbox Full” message, this just means your friend has to listen or reply to the messages you’ve already sent before you can continue to send them more. At 16 kHz, HeyTell delivers messages with twice the frequency range of a cell phone call. It supports earpiece and speakerphone functionality, as well as microphone for the iPhone/iTouch. With the app, you can also favorite and export messages you like to email or Facebook. PrivacyWhenever I write a story about communication apps I get questions regarding privacy. With HeyTell, you can choose from three different privacy levels to control how users can contact you. To connect with other users without invites, use Low privacy. Medium and High require you to accept an invite before connecting with others. Contacts can be quickly blocked, also.
If you elect to, you can share your location with selected contacts while you talk. In order to do this, you must have the Maps page open when sending a HeyTell message. To protect your privacy, your location will not be sent out unless you approve and have that page open. You don’t need to share personal information to connect with HeyTell contacts either, so you can connect without sharing phone numbers or email addresses.
Enough privacy for you? You can also save conversations and replay them offline, or delete them on-demand (there’s a Delete button when you swipe the conversation left or right). Furthermore, all data and audio you transmit through HeyTell to your friends is encrypted in transit. Where Can I Get HeyTell?If you own an iOS device, HeyTell is compatible with the iPhone, iPod Touch (2nd, 3rd, and 4th generation), and iPad. It requires iOS 3.0 or later, though. You can get a hold of this app on iTunes. If you’re an Android user, you can find the app on Android Zoom, or just use a bar scanning app to scan the image below.
ConclusionThere you have it, push-to-talk for your iPhone or Android device. Finally my phone has the capabilities of those old school Sprint phones, which admittedly I always wanted but never went for, because the push-to-talk was the only attractive feature. You won’t have to worry about that with today’s smartphones. HeyTell can be used as a walkie talkie, intercom, or instant voice messaging system to send quick messages to friends and family with iPhones, iPods, or Droids. There’s definitely a lot of functionality to be had using this application. What’s your favorite phone app that enhances the functionality of your device? NEW: Download MakeUseOf iPhone App. FREE!

Similar MakeUseOf Articles
| ||||||||||||||||||||||||
| Three Reasons You Should Consider Buying A Mechanical Keyboard Posted: 28 Dec 2010 02:31 PM PST
Most keyboards use rubber domes to resist the user’s keystrokes, but some keyboards make use of mechanical switches. They’re much more expensive, and as a result the keyboards that use them are often $100 or more. That’s a lot – but let me make a case as to why the price is justified. Better Key Feel
Some users, once they’ve tried a mechanical keyboard, swear never to go back to the typical rubber-dome model. Why? It comes down to key feel. Key feel is a vague term, and always will be, but it generally refers to characteristics such as the speed with which a key returns to its normal position and the resistance a key provides your fingers. Rubber-dome keyboards often feel “mushy” because resistance isn’t linear and/or because the individual keys wobble on the rubber domes below them. Mechanical keys also usually return to their positions more quickly than do rubber-dome keys. This is due to the increased resistance that a mechanical mechanism provides when compared to a rubber dome design. Of course, the audible feedback given by a mechanical keyboard should be mentioned as well. Mechanical keyboards are louder than rubber-dome keyboards because of the mechanical action. While this can be a troublesome trait if you’re trying to use a computer quietly, this additional feedback makes typing more pleasurable. Outstanding Durability
The long life of mechanical keyboards, compared with all other keyboard technologies, has long been citied as an advantage. Perhaps the most famous example of this is the IBM Model M keyboard, which was released in 1984 and continues to be produced today. Many made in the 80′s are still around, and fully functional. In fact, they’re one of the cheapest options for users looking to buy a mechanical keyboard, as used IBM Model M keyboards can be found on eBay and Craiglist frequently. The durability of mechanical keyboards comes down to the design. The switches are made entirely of metal, and most use a metal-on-metal contact (the portion of the key’s design that lets the computer know a key has been pressed). As a result, mechanical keyboards can stand up to 50 million key presses or more – the typical rubber-dome keyboard is good for 10 million at most. In addition, the rubber in a rubber-dome keyboard often degrades over time, resulting in sticky keys, collapsed domes, and other issues. Easy Maintenance
Many rubber-dome keyboards are a real pain to maintain. The rubber itself tends to attract dirt, particularly if it ages and becomes somewhat sticky, which can be a problem with some rubber. In addtion, many rubber-dome keyboards are constructed by laying down a single bit of layer across the entire width of the keyboard, with domes placed in the appropriate places. This can make removal of the rubber for cleaning very difficult or impossible. In addition to this, rubber-dome keyboards often use key attachment methods that are not maintenance friendly. Technically, the keys themselves merely need to rest in the proper place, so a small piece of metal is used to keep the key attached. This metal can be thin, however, and difficult to reattach. Most mechanical keyboards, by contrast, let you remove each individual key. The switches are self-contained, and the area between them is merely flat plastic. This makes cleaning easy, and keys can be re-attached with firm pressure. ConclusionMechanical keyboards typically aren’t cheap. The least expensive new models are from Unicomp, the company that continues production of the old Model M keyboard. The Customizer 101 model sells for $69. More modern keyboards, such as the SteelSeries 7G and Das Keyboard, run for between $120 and $150. Not everyone will appreciate a mechanical keyboard. If you only spend an hour or two on your PC per day, they’re probably not for you. Those who spend a lot of time on your PCs daily, however, should seriously consider the points outlined above. Image Credit : TrustedReviews NEW: Download MakeUseOf iPhone App. FREE!

Similar MakeUseOf Articles
| ||||||||||||||||||||||||
| How To Make Your Own Smartboard With A Wii Remote Posted: 28 Dec 2010 01:31 PM PST
Now if you just don’t have the budget for a full-price smartboard, here’s something you will love: it’s a neat hack to use a Wii remote (Wiimote) and an infrared pen as a smartboard. Using a few cheap tools you might already have alongside some free software, you have the recipe for a smartboard. This is a fine hour for open source and hacking popular gadgets! Why Use A Smartboard?Backing up a bit in case you’re not completely familiar with smartboards, essentially a smartboard is when your computer screen is projected onto a white screen and you can manipulate this projection as if it’s a giant touch-screen. Now, here’s a quick run-down of the sorts of things you can do with a smartboard:
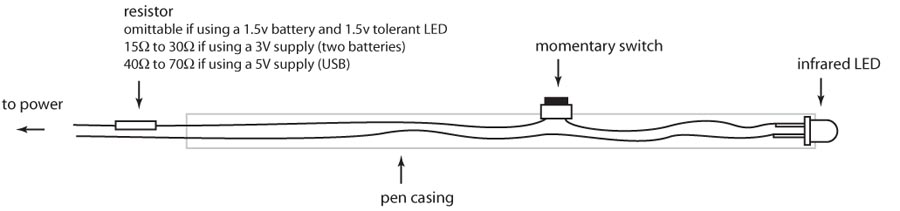
Basics Of A Wiimote SmartboardJohnny Chung Lee is the designer of the Wiimote Smartboard and the full instructions and YouTube demo are available on his website. Essentially, the Wiimote Smartboard works like this: the Wii remote can track up to four infrared signals. So if you project your computer screen onto a white screen (or just use a large LCD monitor) and point your Wii remote in the same direction, you can interact with your computer using up to four infrared pens. What You NeedYou will need:
HintsBefore you run into trouble, take this advice:
Software OptionsThere are free and paid software options available:
How To Make Your Wii-Remote Smartboard
Love Hacking?If you’re a bit of a DIY hacker, then you might also love these posts:
Let us know how you use your smartboard (Wii-remote variety or purpose-built). Do you use it in a classroom or for work? What works well? Let us know in the comments! Do you like MakeUseOf articles? Don’t forget to share our articles with others! It’s really important to us.

Similar MakeUseOf Articles
| ||||||||||||||||||||||||
| Posted: 28 Dec 2010 12:15 PM PST
For more fresh hot deals, visit our Hot Tech Deals page, which is constantly updated. Keep reading to find out today’s Hot Tech Deals.
Image credit: Modified from Svengraph’s icon set Follow MakeUseOf on Twitter. Includes cool extras.

Similar MakeUseOf Articles
| ||||||||||||||||||||||||
| 7 Citizen Journalism Websites For Crowdsourced News Posted: 28 Dec 2010 11:31 AM PST
Citizen journalism in the simple sense is news collected and published online by people like you and me. We aren't reporters by any stretch, but citizen journalism websites gives us an opportunity to speak as interested observers. It is freedom of speech without any censorship in its unadulterated sense.
Now Public
A multimedia news site with 5 million readers puts it in the top bracket of citizen journalism news coverage. NowPublic.com says that it receives news from 6,000 cities in 160 countries. The crowdsourced news site accepts news, views, photos, and videos from its legion of contributors. News items range from 250 words to 600 words in length. You can also check out Examiner.com, a sister site which is more selective about news but has a payment model (North America only) that's still lacking in NowPublic.com. CNN iReport
CNN iReport is an example of a mainstream news media company that's also tapping into the power of citizen journalism. CNN says that the stories in this section are not edited, fact-checked or screened before they post. Only the ones marked with a ‘CNN iReport’ badge have been vetted by CNN. News contributors are also awarded honor badges for their contributions and some of them make it to the 'Superstar' list. As a part of CNN, the citizen generated news content gets its share of eyeballs. Digital Journal
You will be known as a Digital Journalist and you will be paid (by way of a share in ad revenues) for your contributions. I write for them occasionally and can say that the level of professionalism is pretty high. Digital Journal is based in Canada and it started out as a technology news site. You can sign up, read and write news stories, and also start a blog. It is among the earliest citizen journalism sites on the web. Digital Journal, like all community based websites, tries to promote interaction among its members. All Voices
Allvoices.com is probably the only crowdsourced news with a cartoon section. Otherwise, it follows the pattern of a usual contribution run news website. Apart from crowdsourced news, some events are also posted automatically from news RSS feeds (marked as Mainstream News). Newsvine
Newsvine is a collaborative crowdsourced news website that's owned by MSNBC. Newsvine is well regarded as one of the top most user generated news websites. News is a combination of contributed content (links and detailed articles) and mainstream news from Associated Press. Newsvine pays contributors from a share of the ad-revenues. Newsvine also maintains a leaderboard reflecting the popularity rank of all its contributors. When you join, you will be taken to the Greenhouse where new users are announced to the community. Wikinews
Wikinews is as good a place as any to try out your journalism skills. The moot point of Wikipedia's sister site is that it stresses on neutral, unbiased reporting. Opinionated news articles are ruled out. As is true of any wiki, you have to follow strict content guidelines. But if you have an internet connection and an eye for news, this is a place to get a global audience. Check out the Water Cooler link where you can discuss issues beyond the news. Demotix
Demotix could really make a scribe out of you as they provide a platform for licensing your contributed news stories to media channels (200 of them). The U.K based Demotix is a citizen journalism website plus a photo agency. The community is a 17,000 strong group of 'street journalists' from 190 countries. The Wikipedia page on Demotix makes for an interesting read and also captures how amateur journalism can leave an impact. Do you think that these seven websites can make you shout “stop the press”? There are a few more crowdsourced news sites with citizen journalism content out there. Let us know about the ones you read for the news. And if you are thinking of becoming one yourself, read the Top 5 Online Resources for the Citizen Journalist. Image Credit: Shutterstock Follow MakeUseOf on Twitter. Includes cool extras.

Similar MakeUseOf Articles
| ||||||||||||||||||||||||
| How To Use Mind-Mapping Software To Organize Your New Year Resolutions Posted: 28 Dec 2010 10:31 AM PST
Even if you’re jotting down ideas on a napkin or piece of paper, you should know that mind-mapping software can ensure that you won’t get that napkin lost, you can keep an image of the whole outline as your desktop wallpaper, you can move items around cleanly, etc.
Break Goals Down Into TasksLet’s say your goal is to become a more seasoned cook because you can save money and/or simply because your cooking skills truly stink. You can break your goal down to several tasks that might come hand in hand with cooking more, such as:
We’ll create different bubbles in an outline on Bubbl.us. You can click on Start Brainstorming button on the site to use the demo (or you can sign up if you want to keep a version of this map online for later retrieval).
You’ll want to type your individual subtasks under each goal by pressing Enter for a new sub-item, and Tab for an item of the same level (sibling bubble).
List Resolutions With Monthly/Weekly GoalsNow in order to keep up with the subtasks, you’ll want to set them up in time frames accordingly. Do you want to make sure you keep up with them on a weekly basis or monthly basis? Depending on your answer, you’ll want to schedule items for each day, week, month, or another interval (e.g. every 3 months). To adjust your mind map, move the sub-items around, under the main goals, and create child bubbles for time-related entries.
Visualize & Transfer To Task Manager/CalendarSince now you can view your outline in its full glory with all of the sub-items, you can save your sheet as a picture by clicking on Menu on the bottom right corner.
You’ll then get the options of saving your sheet as a PNG or JPG image, which comes out nicer-looking than the way it looks on the website.
If you use a web-based or desktop task manager or calendar, you can also input your items according to the time frames you designated for each subtask.
Depending on your task manager or calendar software (most apply), you might be able to save yourself from inputting repeated items by using the “repeat every:” feature.
Overall, this is a very simplified way to organize your New Year resolutions and plan ahead. I know I have several things I’d like to accomplish next year, but haven’t yet implemented a system to make sure I can follow up with my wishes so I’ll do this for sure. Do you have any other ideas for mind-mapping software? How do you keep up with your New Year resolutions (if you have any)? Got Questions? Ask Them Now FREE on MakeUseOf Answers!

Similar MakeUseOf Articles
| ||||||||||||||||||||||||
| How To Create & Use A USB Ubuntu Linux Boot Jump Drive Posted: 28 Dec 2010 09:31 AM PST
Here are the steps to put a fully working, USB Ubuntu Linux boot jump drive. Creating The Boot Drive
Just a quick note, according to my experiments, creating the boot disk under Ubuntu is faster.
Another alternative that you can use to create an Ubuntu boot drive is Unetbootin. This application will also allow you to create a boot drive for other Linux distros. Using The Boot Jump DriveTo use the boot drive, you need to boot your machine with the USB drive inserted. Some machines have already set the boot order to start from Optical Drive, then External Drive (USB included) and finally – when no other drives present – internal Hard Drive; while some others start with internal Hard Drive. You might have to choose the boot drive manually depending on your machine boot setup. Different machines have different setups, so you need to consult your documentation (or geeky friend) to know more.
The most common way to change the boot drive is to press F10 during boot and use the Up/Down and Enter keys to choose which drive you want to boot from. Or you could permanently change the order of your machine’s boot drive using the BIOS setup. Some machines utilize F2 key during boot up to access the BIOS setup. But again, yours might use a different method. Installing Ubuntu (or other Linux distros) in a USB thumb drive is a perfect way to try out Ubuntu without modifying your system. It’s also a great way to have your own beautiful, fast, and virus-free personal portable working environment inside a thumb drive. Have you tried creating USB Linux boot jump drive? What do you use it for? Share your stories using the comments below. Hey Facebookers, make sure to check out MakeUseOf page on Facebook. Over 24,000 fans already!

Similar MakeUseOf Articles
| ||||||||||||||||||||||||
| How To Fix An Overheating Laptop Posted: 28 Dec 2010 08:31 AM PST
The greatest threat for your laptop, except for your your coffee mug, is overheating. It can cause hardware failure and permanent damage. In this article I will introduce ways that you can prevent or fix an overheating laptop and thus improve the performance and the extend the lifespan of your laptop. How Do You Know Your Laptop Is Overheating?A sure sign that your notebook gets too hot is when your fan always runs at maximum speed. You may also experience reduced performance because the CPU cuts back its clock speed to escape heat pressure. Moreover, the fail safe software may trigger a sudden shutdown to prevent hardware damage.
Refer to the article 3 Laptop Computer Temperature Monitor Apps That Could Save Your Hard Drive to find out how you can measure the actual heat values inside your laptop. What Causes Overheating?In two words: insufficient cooling. The reasons include dust blocking intake grills or exhaust ports, a clocked up fan, or a degenerated thermal grease (aka thermal compound) between the heat sink and the CPU. How Can You Prevent or Fix an Overheating Laptop?There are several hardware fixes that can cure overheating. 1. Fix Internal CoolingThe first and most important thing you need to do when your laptop is overheating, is to clean the fan/s that provide/s cooling to the CPU and graphics card. Over time they build up layers of dust and dirt that slow them down and block flow of air. Consult your laptop’s manual or manufacturer to find out how you can open the laptop to access and clean these parts. Before you attempt to do any cleaning, however, follow these steps:
Carefully clean the fan/s with a cotton swab dipped in a drop of alcohol. Make sure the alcohol has completely evaporated before you reconnect the laptop to the power. You can also use a vacuum cleaner to remove the dust and dirt that clocks up the fan/s. To prevent damage to the fan, do not let it revolve in the wrong direction. If you want to use canned air to clean the fan, arrest the fan by holding it down.
Next, you can clean the exhaust port by sucking out air with a vacuum cleaner. The exhaust port usually sits on the side of the laptop. It’s the opening that blows out hot air. The intake grills are small openings that allow air to be sucked into the laptop by the revolving fans. They can sit on the sides or at the bottom of your notebook. To clear the intake grills, spray them with canned air. Finally, you can apply fresh thermal grease to the interface between the CPU and its heat sink. Again, please consult the laptop’s manual or manufacturer to obtain instructions on how to disassemble these components. Inside My Laptop has some great tutorials on how to fix your laptop, including How to apply thermal grease on laptop processor. 2. Keep The Laptop On A Hard & Flat SurfaceMost laptops suck in cooling air through their bottoms. If the laptop sits on an uneven surface like a blanket, pillow, or your lap, the flow of air into the laptop is disturbed. Subsequently, the cooling is not optimal, heat builds up, the surface becomes hot, the temperature of sucked in cooling air increases, and eventually the laptop overheats. This scenario is easily avoided by keeping the laptop on a hard and flat surface. You can use something as simple as a tray or get a special laptop holder or lap stand. 3. Invest In A Laptop CoolerLaptop coolers are meant to provide additional cooling. However, getting the wrong cooler can actually make the problem worse. Before you purchase a cooler, you need to understand the flow of air into and out of your laptop.
As mentioned above, most laptops suck in air for cooling from the bottom. This makes sense because warm air rises upwards. However, a cooler that sits underneath the laptop and sucks air away from it, does not contribute to laptop cooling and rather causes a more rapid overheating. If your laptop has intake grills at its bottom, purchase a cooler that blows cool air upwards, i.e. into the laptop. You can also get a passive cooler that does not consume power and merely absorbs heat. What Are Potential Software Fixes?If none of the hardware fixes result in lasting improvements, you can also revert to software fixes that address the performance and power usage of your laptop. However, addressing excessive heat with a software fix means you give up performance in favor of preserving the hardware. You can either reduce the brightness of your screen or reduce the CPU clock speed. In Windows, underclocking or undervolting is done in the BIOS, but can also be controlled through software tools. Consult the Undervolting Guide on the Notebook Review forum for more information about this procedure. The Top 3 Signs Your Laptop Is OverheatingFinally, let’s lighten this up a little. This list was inspired by a Top 11 list on BBSpot.
How often do you clean your laptop to prevent it from overheating? Do you have any additional tips and tricks to share? Image credits: Steve Cukrov, Sergej Khakimullin, Olga Popova, Jiri Pavlik

Similar MakeUseOf Articles
| ||||||||||||||||||||||||
| Contigo Autoseal Spill-Proof Travel Mug Review and Giveaway Posted: 28 Dec 2010 08:00 AM PST
Both mugs are available from Contigo in several colours and isn’t very expensive. We’ll take you through both the mugs and a short field test to see if the numbers hold true. We’ll also be giving away 2 West Loop mugs and 2 Elle mugs this week. So find out how you can win them after the jump. AUTOSEAL West Loop Stainless Steel Travel MugFirst up, the West Loop. This mug is made out of stainless steel and comes in a variety of colours: silver, blue, green, black, red, purple and one in red stripes. Regardless of their colour, all West Loop mugs feature Contigo’s AUTOSEAL self-sealing lid, which is 100% spill- and leak-proof. To sip, one only needs to push the release button and let go to seal the lid. This makes drinking from the mug very accessible. No uncapping and pouring required — which is quite convenient.
The double-wall, vacuum-insulated, stainless steel body is stylishly attractive and functional in providing temperature retention. The lid screws on to the body very tightly and so far, I’ve never encountered any leaking. The body is also contoured so that it’s much easier to hold. I ran a couple of tests to see if the West Loop managed to keep my drinks hot or cold close to Contigo’s claim of 4 and 12 hours respectively. The test was carried out in a room with no wind and both the mugs were kept stationary throughout the entire period. By the end of the 4th hour, what started out as hot coffee was more luke-warm. I’d say that optimally, the West Loop would be able to hold hot drinks for a maximum of 3 hours, for your drinking pleasure. In reality, most of us would actually require a mug to carry hot drinks over short distances for a short period of time, but it’s good to know that after 3 hours, your coffee would still be drinkable.
For cold drinks, things actually looked better. My chilled orange juice was still coldish when sipped after 12 hours. And it continued to remain that way up to the 14th hour. The thing I liked most about the West Loop is its body. It’s shaped very nicely and is quite light. It also looks very stylish. However, its strength is also its weakness. Since it’s made out of steel, it’s pretty malleable. Dropping a fluid-filled West Loop would mean dents and scratches all over. AUTOSEAL Elle Double Wall Insulated MugNext up is the Elle mug. This one features the same AUTOSEAL lid that automatically opens when the button is pressed and seals shut when released. Over time, I’ve gotten to be really confident in the lid, assuring myself that it will never leak. The only difference between this lid and the one used in the West Loop is that little bit of rubber trim around the side.
Its double-walled body, being made from plastic is taller and slimmer than the West Loop. However, it doesn’t feature the vacuum insulation technology used in the West Loop and as a result, it holds drinks hot/cold for a shorter period of time; specifically, hot for 1 hour and cold for up to 4 hours. So the Elle would probably be better suited for people who drink quickly.
The Elle also comes in a variety of colours: pink, black and red. And since it’s made out of plastic, it’s more durable than the West Loop in certain instances; falling, for example. I’m pretty happy to endorse Contigo’s West Loop and Elle travel mugs. They’re both stylish and functional, not to mention very impressive mugs. The one thing that you must keep in mind when using a Contigo mug that has an AUTOSEAL lid is that it may unlock itself if kept in a bag, which may result in an accidental spill. So these mugs are best used when held in your hand. We’ve got 2 West Loop and 2 Elle mugs to give away! How do I win one?It’s simple, just follow the instructions.
Giveaway eligibility You must be a fan of our Facebook page to enter; Individuals who are over the age of 18. If you are under 18, get your parents to participate on your behalf; Individuals who reside in a country embargoed by the United States; Belgium, Norway, Sweden, or India are not permitted to enter. This giveaway begins now and ends Friday, January 7th, 2011 at 2100hrs PST. The winners will be selected at random and announced via email. Spread the word to your friends and have fun! MakeUseOf would like to thank Contigo for their generosity while participating in this giveaway. Interesting in sponsoring? We’d love to hear from you. Get in touch with us via email. Do you like MakeUseOf articles? Don’t forget to share our articles with others! It’s really important to us.

Similar MakeUseOf Articles
| ||||||||||||||||||||||||
| How To Clean Up Your Computer Back To Its Original State (Without Reinstalling Windows) Posted: 28 Dec 2010 07:31 AM PST
But what if you don't want to wipe your computer clean? If this is the case, you'll need to use a few specific utilities if you'd like to clean up your computer to return it to a near-new state. This method isn't always quicker than reinstalling Windows, but it's often preferable if you don't want to worry about losing files or you don’t have a Windows install disc handy. Let's take a look at what you'll need to finish the job. Use Windows Backup and Restore
Recent versions of Windows, including Windows Vista and 7, include a Backup and Restore feature in the control panel. This feature lets you restore your computer to a previous state by using the Open System Restore option, which begins a simple process that basically rewinds your computer to an earlier state. This is easy, but there is one critical issue – you actually need a restore point to restore from! It's not uncommon for a computer to ship with one already configured, but if you or the manufacturer didn't already do this, you'll have to use the steps below. Uninstall Unwanted Programs
The gradual accumulation of software on a computer often results in reduced performance, and uninstalling the programs that did not come with your PC often improve performance – or at least free up some hard drive space. Starting with the uninstallation of unwanted programs is recommended. Most programs can be uninstalled using the Programs and Features tool in the Windows control panel, but some may be stubborn and refuse to uninstall correctly. I suggest using Revo Uninstaller, or a similar program, to take care of programs that refuse to leave quietly. Clean Up The Windows Registry
Once you uninstall a program, it's gone, right? Actually, that's not always the case. Windows includes a database known as the registry that includes information about programs installed, and while uninstalling a program is theoretically meant to remove the program's registry entries, that doesn't always happen. A bloated registry can sometimes reduce performance, so it's a good idea to try and make it like new. There are a lot of registry cleaning tools, but Wise Registry Cleaner is the option that receives our top recommendation. Whatever tool you use, remember to create a Windows backup (remember the Backup and Restore feature) because there is always a very, very slight risk of registry damage, which can cripple your computer. Disable Startup Programs
Even after you have uninstalled unwanted programs, you may still have some issues with slow boot times if you have too many programs trying to run when your computer starts. To disable some programs, go to the Windows Search bar and then type in "msconfig.” Navigate to the Startup tab and review the programs listed. These are the programs that load when your computer boots. You can disable specific programs by de-selecting their checkbox and then clicking OK. If you find that you've disabled a program that is truly useful, you can always return to msconfig and enable the program again. Restore Windows DefaultsOver time, you may make changes to a number of critical Windows features. It is difficult to cover every single feature in Windows that can be restored to default settings, but here are some that are commonly changed and easily restored. Note that the below instructions are for computers using Windows 7.
Restore Browser DefaultsIf you're using Internet Explorer, you can use the Internet Options menu in the Windows Control Panel. There are Default buttons in the Security, Privacy, Programs and Advanced tabs. Google Chrome and Firefox have similar buttons in their respective Options menus. Restore Firewall DefaultsThe Windows Firewall options can be found in the Windows Control Panel. There is a Restore Firewall Defaults option on the left hand options menu. Note that you may not want to restore this to default if you've made specific changes to the firewall's rules. FoldersThe Folders Options window can be accessed from the Windows Control Panel. The Restore Defaults option is in the lower right hand corner. LibrariesRight-click on Libraries icon and then click Restore Default Libraries. You can find the Libraries icon in the left-hand frame of Windows Explorer. Restore Your Media PlayerMost media players have an option that will let you dismantle your current media library and rebuild it from scratch. This isn't a bad idea if your media files have turned into a mess.
Start MenuThe Start Menu can be returned to its default settings by right-clicking on Start (or the Start Icon), entering the Properties window, and then clicking the Customize button. The Use Default Settings button will appear at the bottom of the Customize Start Menu window. TaskbarRight-click the Taskbar, then click on Properties. Strangely, there is no default button. The default settings are as follows; all options under Taskbar Appearance unchecked, Taskbar location set to Bottom, Taskbar buttons set to Always combine, hide labels. Remove Old Devices And PrintersThe Devices and Printers section of the Windows Control Panel is the place to go if you need to remove peripheral hardware that is no longer in use. This usually doesn't have an impact on performance, but has other benefits – for example, removing several old printers can making printing more intuitive. ConclusionFollowing these steps should restore your computer to a near-new state. This is not as complete as reinstalling Windows, and this process is not recommended if you're trying to restore your computer after a malware attack. If you're simply trying to speed up your computer, reduce clutter, or wipe it clean for a new user, the steps above should prove sufficient. Follow MakeUseOf on Twitter. Includes cool extras.

Similar MakeUseOf Articles
| ||||||||||||||||||||||||
 Check out some of the latest MakeUseOf discoveries. All listed websites are FREE or come with a decent free account option. You can make use of them without spending a dime. If you want to have similar cool websites round-ups delivered to your email daily email subscribe


 It’s no secret that apps are the thing of the future. In many cases, they give our phones enhanced functionality that you wouldn’t otherwise get from them, depending on the phone you have of course. Last month, for instance, I gave you


 It’s easy to take your keyboard for granted. They don’t seem to do anything besides sit on your desk, resisting the punishment of your fingertips. Upon closer examination, however, the keyboard becomes very important. It is, along with your mouse, one of two ways that you interact with your computer. And if you’re like me, and you use your computer for eight hours a day or more, the quality of the keyboard becomes very important.


 If you’re a teacher or you regularly make presentations for work, you’ve probably heard about smartboards and wondered vaguely if they would be useful for your presentations. In short, they probably would as they tend to engage the audience well, allowing them to really follow what you’re trying to teach them.
 If you’re in the market for a new computer, laptop, mobile phone, games and other accessories; don’t waste your time searching online. We’ve taken the liberty of locating the best tech deals and unifying them into a single post for your convenience.
 Citizen journalism may or may not be true journalism; in fact a lot of it is not. But it is a concept that has been embraced by the open nature of the web. Think of citizen journalism as ‘open source’ news reporting and you wouldn't be far off the mark.


 If you’re looking to create (or revise) your New Year resolutions, you might want to peek at mind-mapping software to organize a master plan or outline to house the steps you’ll take to follow through with each resolution. If you have an idea of what resolutions you want to keep in the upcoming year, a good idea might be to set up a system to facilitate getting those goals completed.


 Even though


 Laptops have undergone an incredible amount of development over the past couple of years. A steep increase in performance was facilitated by chips that are ever more densely packed with transistors. In parallel, the amount of processors was multiplied, the hardware was put into slimmer cases, and better graphics cards enabled bigger screens with higher resolutions. These developments, however, come at a cost: heat.


 We’ll be taking a look at 2 different travel mugs from Contigo today. The first is called the


 The easiest way to restore a Windows computer back to its factory defaults is to simply use the included recovery program to reinstall or recover Windows. This works well in many situations, and you can use this method to completely wipe your computer clean and start from new.


| You are subscribed to email updates from MakeUseOf.com To stop receiving these emails, you may unsubscribe now. | Email delivery powered by Google |
| Google Inc., 20 West Kinzie, Chicago IL USA 60610 | |
No comments:
Post a Comment